1. The Recommend Python Flask Project Directory Structure.
- The following is an example of a python flask project directory structure that meets the official recommendation of Flask small applications.
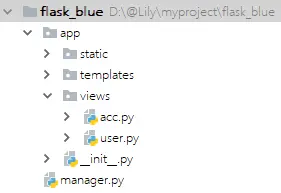
- The above picture is the directory structure that we have built. Let’s look at it layer by layer. First is the app directory, which is our main application directory. There is an __init__.py file in it. The contents of the app/init.py is as follows. We can see that the file __init__.py is a function to build the app and register the blueprint in the views.
from flask import Flask from .views.acc import acc_bp from .views.user import user_bp def create_app(): my_app = Flask(__name__) my_app.register_blueprint(acc_bp) my_app.register_blueprint(user_bp) return my_app app/__init__.py - Next, look at the static directory, this directory can be understood literally, it is the static file storage directory.
- Then there is the templates directory, which is the template files storage directory.
- The views directory stores the view function files, which is our blueprint, and each file is a blueprint. There are 2 view files ( views/acc.py & views/user.py ) in the views directory as below.
views/acc.py from flask import Blueprint acc_bp = Blueprint('acc', __name__) @acc_bp.route("/acc") def accfunc(): return "my_app.acc" ************************************************************ views/user.py from flask import Blueprint user_bp = Blueprint('user', __name__) @user_bp.route("/login") def user_login(): return "my_app.user" - Next is a key file manager.py, the startup file of the project, the content is as follows.
manager.py

from app import create_app

my_app = create_app()

if __name__ == '__main__':
    my_app.run()
2. Flask-SQLAlchemy.
Next, based on the Flask project above, we want to add Flask-SQLAlchemy to make the project come alive.
- Install the
Flask-SQLAlchemyuse pip command as below.$ pip install Flask-SQLAlchemy Collecting Flask-SQLAlchemy Downloading Flask_SQLAlchemy-2.5.1-py2.py3-none-any.whl (17 kB) Collecting Flask>=0.10 Downloading Flask-2.0.1-py3-none-any.whl (94 kB) |████████████████████████████████| 94 kB 288 kB/s Collecting SQLAlchemy>=0.8.0 Downloading SQLAlchemy-1.4.17-cp37-cp37m-macosx_10_14_x86_64.whl (1.5 MB) |████████████████████████████████| 1.5 MB 3.5 MB/s Collecting click>=7.1.2 Downloading click-8.0.1-py3-none-any.whl (97 kB) |████████████████████████████████| 97 kB 729 kB/s Collecting itsdangerous>=2.0 Downloading itsdangerous-2.0.1-py3-none-any.whl (18 kB) Collecting Werkzeug>=2.0 Downloading Werkzeug-2.0.1-py3-none-any.whl (288 kB) |████████████████████████████████| 288 kB 551 kB/s Requirement already satisfied: Jinja2>=3.0 in /Library/Frameworks/Python.framework/Versions/3.7/lib/python3.7/site-packages (from Flask>=0.10->Flask-SQLAlchemy) (3.0.0) Requirement already satisfied: importlib-metadata in /Library/Frameworks/Python.framework/Versions/3.7/lib/python3.7/site-packages (from click>=7.1.2->Flask>=0.10->Flask-SQLAlchemy) (3.8.0) Requirement already satisfied: MarkupSafe>=2.0.0rc2 in /Library/Frameworks/Python.framework/Versions/3.7/lib/python3.7/site-packages (from Jinja2>=3.0->Flask>=0.10->Flask-SQLAlchemy) (2.0.0) Collecting greenlet!=0.4.17 Downloading greenlet-1.1.0-cp37-cp37m-macosx_10_14_x86_64.whl (87 kB) |████████████████████████████████| 87 kB 689 kB/s Requirement already satisfied: typing-extensions>=3.6.4 in /Library/Frameworks/Python.framework/Versions/3.7/lib/python3.7/site-packages (from importlib-metadata->click>=7.1.2->Flask>=0.10->Flask-SQLAlchemy) (3.7.4.3) Requirement already satisfied: zipp>=0.5 in /Library/Frameworks/Python.framework/Versions/3.7/lib/python3.7/site-packages (from importlib-metadata->click>=7.1.2->Flask>=0.10->Flask-SQLAlchemy) (3.4.1) Installing collected packages: Werkzeug, itsdangerous, greenlet, click, SQLAlchemy, Flask, Flask-SQLAlchemy Successfully installed Flask-2.0.1 Flask-SQLAlchemy-2.5.1 SQLAlchemy-1.4.17 Werkzeug-2.0.1 click-8.0.1 greenlet-1.1.0 itsdangerous-2.0.1 - Add Flask-SQLAlchemy third-party components.
Below is the content of app/__init__.py file. from flask import Flask # Import SQLAlchemy from Flask-SQLAlchemy from flask_sqlalchemy import SQLAlchemy # Instantiate a SQLAlchemy object. Note: The code to instantiate SQLAlchemy must before the blueprint is used. db = SQLAlchemy() # Import the blueprint. from .views.acc import acc_bp from .views.user import user_bp def create_app(): my_app = Flask(__name__) # Initial app configuration, specifically configured for SQLAlchemy my_app.config["SQLALCHEMY_DATABASE_URI"] = "mysql+pymysql://root:@127.0.0.1:3306/wll?charset=utf8" # SQLAlchemy connection pool size my_app.config["SQLALCHEMY_POOL_SIZE"] = 5 # SQLAlchemy connection timeout my_app.config["SQLALCHEMY_POOL_TIMEOUT"] = 15 my_app.config["SQLALCHEMY_TRACK_MODIFICATIONS"] = False # Initialize the SQLAlchemy object by reading the above configuration. db.init_app(my_app) my_app.register_blueprint(acc_bp) my_app.register_blueprint(user_bp) return my_app - Create models.py (ORM model file) in the app directory.
Below is the content of file app/models.py from app import db # Create the users data table. class Users(db.Model): __tablename__ = 'users' # __table_args__ = {"useexisting": True} # Flask-SQLAlchemy also encapsulates Column, Integer, String, etc. id = db.Column(db.Integer, primary_key=True) name = db.Column(db.String(32)) password = db.Column(db.String(32)) if __name__ == '__main__': from app import create_app my_app = create_app() # Here you need to review the Flask application context management. with my_app.app_context(): # Delete all tables db.drop_all() # Create table db.create_all() - Do you remember that we manually opened the session db_session in SQLAlchemy as below.
from sqlalchemy.orm import sessionmaker
  Session = sessionmaker(engine)
  db_session = Session()
Now you do not need to do it by yourself, because Flask-SQLAlchemy has done the job of opening the db session for us as below.
Below is the content of file views/user.py from flask import Blueprint, request, render_template user_bp = Blueprint('user', __name__) from app.models import Users from app import db @user_bp.route("/login", methods=['GET', 'POST']) def user_login(): if request.method == 'POST': username = request.form.get('username') password = request.form.get('password') # In the past we need to manually open the session db_session in sqlalchemy # from sqlalchemy.orm import sessionmaker # Session = sessionmaker(engine) # db_session = Session() # Now Flask-SQLAlchemy has done the job of opening the db session for us. db.session.add(Users(name=username,password=password)) db.session.commit() # Query. user_obj = Users.query.filter(Users.name == username and Users.password == password).first() if user_obj: return f"{user_obj.name}Login Success" return render_template("login.html") - Login page templates/login.html.
<!DOCTYPE html>
<html lang="en">
<head>
  <meta charset="UTF-8">
  <title>Title</title>
</head>
<body>
<form method="post" action="">
  <input type="text" name="username">
  <input type="password" name="password">
  <input type="submit">
</form>
</body>
</html>
3. Flask-Script.
- Run the below command in a terminal to install Flask-Script.
$ pip install Flask-Script Collecting Flask-Script Downloading Flask-Script-2.0.6.tar.gz (43 kB) |████████████████████████████████| 43 kB 77 kB/s Requirement already satisfied: Flask in /Library/Frameworks/Python.framework/Versions/3.7/lib/python3.7/site-packages (from Flask-Script) (2.0.1) Requirement already satisfied: click>=7.1.2 in /Library/Frameworks/Python.framework/Versions/3.7/lib/python3.7/site-packages (from Flask->Flask-Script) (8.0.1) Requirement already satisfied: Werkzeug>=2.0 in /Library/Frameworks/Python.framework/Versions/3.7/lib/python3.7/site-packages (from Flask->Flask-Script) (2.0.1) Requirement already satisfied: Jinja2>=3.0 in /Library/Frameworks/Python.framework/Versions/3.7/lib/python3.7/site-packages (from Flask->Flask-Script) (3.0.0) Requirement already satisfied: itsdangerous>=2.0 in /Library/Frameworks/Python.framework/Versions/3.7/lib/python3.7/site-packages (from Flask->Flask-Script) (2.0.1) Requirement already satisfied: importlib-metadata in /Library/Frameworks/Python.framework/Versions/3.7/lib/python3.7/site-packages (from click>=7.1.2->Flask->Flask-Script) (3.8.0) Requirement already satisfied: MarkupSafe>=2.0.0rc2 in /Library/Frameworks/Python.framework/Versions/3.7/lib/python3.7/site-packages (from Jinja2>=3.0->Flask->Flask-Script) (2.0.0) Requirement already satisfied: typing-extensions>=3.6.4 in /Library/Frameworks/Python.framework/Versions/3.7/lib/python3.7/site-packages (from importlib-metadata->click>=7.1.2->Flask->Flask-Script) (3.7.4.3) Requirement already satisfied: zipp>=0.5 in /Library/Frameworks/Python.framework/Versions/3.7/lib/python3.7/site-packages (from importlib-metadata->click>=7.1.2->Flask->Flask-Script) (3.4.1) Using legacy 'setup.py install' for Flask-Script, since package 'wheel' is not installed. Installing collected packages: Flask-Script Running setup.py install for Flask-Script ... done Successfully installed Flask-Script-2.0.6 - Flask-Script, as the name suggests, is the script of Flask. The startup command of Django is python manager.py runserver, Flask can do it also, which is based on Flask-Script.
- Add Flask-Script to the Flask project with the below source code.
manager.py # Import the Flask-Script Manager class. from flask_script import Manager from app import create_app my_app = create_app() # Let the app to support manager manager = Manager(my_app) if __name__ == '__main__': # Replace the original my_app.run() with manager.run() # my_app.run() manager.run() - Start the flask project with the below command.
python manager.py runserver
- You can also start the flask project and change the configuration parameters (listening IP address and port number) as below.
python manager.py runserver -h 0.0.0.0 -p 9527
- Advanced operation – custom script commands.
# Import Flask-Script Manager module from flask_script import Manager from app import create_app my_app = create_app() # Create a Manager object by the app to let it support manager manager = Manager(my_app) @manager.command def runflask(arg): # my_app.run() print(arg) if __name__ == '__main__': # my_app.run() manager.run() manager.py - Run the below command.
python manager.py runflask 22
4. Flask-Migrate.
- Install flask-migrate.
pip install Flask-Migrate
- Add Flask-Migrate (Note: Flask-Migrate depends on Flask-Script components) to the project.
# Import the Manager in Flask-Script from flask_script import Manager # Import Migrate and MigrateCommand in Flask-Migrate from flask_migrate import Migrate, MigrateCommand from app import create_app my_app = create_app() manager = Manager(my_app) from app import db # Since it is a database migration, then you should tell the program where the database is and which app to support Migrate(my_app, db) # Next, tell the manager that there is a new command. This new command is stored in MigrateCommand. # Mapping the database command appears in your command with the MigrateCommand. manager.add_command("database", MigrateCommand) """ Database migration instructions: python manager.py database init # Equal to makemigration in Django python manager.py database migrate # Equal to migrate in Django. python manager.py database upgrade """ @manager.command def runflask(arg): print(arg) @manager.option("-n", "--name", dest="name") @manager.option("-s", "--say", dest="say") def talk(name, say): print(f"{name} {say}") if __name__ == '__main__': manager.run() manager.py - When you execute the below database initialization instructions, you will find that a migrations directory appears in your project directory.
python manager.py database init
- Execute database migration instructions and then you will find a users table in the database.
# Equal to makemigration in Django
python manager.py database migrate

# Equal to migrate in Django.
python manager.py database upgrade
