Performance is especially important for iOS applications, However, due to the limitations of iOS devices, it is sometimes difficult to perform well. This article will just give you some advice about how to make iOS app performance better.
1. Try To Set Views To Opaque.
- If you have opaque Views, you should set their opaque attribute to YES, The reason is that this allows the system to render these views in an optimal way. This simple property can be set in either IB or source code.
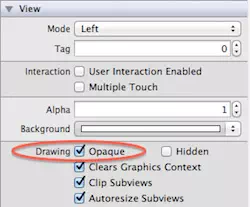
- If you set the Opaque attribute to YES, then the rendering system thinks the view is completely opaque, which allows the rendering system to optimize some rendering processes and improve performance,
- If set it’s value to NO, the rendering system normally forms the View with other content, the default value is YES.
- In a relatively static screen, setting this property does not make much difference. However, when the view is embedded in a scroll view, or part of complex animation, it will greatly affect the performance of the app if this property is not set to YES.
- You can use the Debug\Color Blended Layers option in the simulator to discover which views are not opaque.
2. Don’t Block The Main Thread.
- Never overburden the main thread, because UIKit does all the work on the main thread, rendering, managing the touch response, responding to the input, and so on.
- The risk of using the main thread all the time is that if your code blocks the main thread, your app will lose its response.
- Most of the situations that block the main process are when your app is doing I/O operations that involve reading and writing external resources, such as storage or networks.
- You can use
NSURLConnectionto do network operations asynchronously.(void)sendAsynchronousRequest:(NSURLRequest)request queue: (NSOperationQueue )queue completionHandler: (void (^)(NSURLResponse, NSData, NSError*))handler
- Or use frameworks like AFNetworking to do this asynchronously.
- If you need to do other types of operations that require huge resources (such as time-sensitive computing or storage reads and writes), you can use Grand Central Dispatch, NSOperation, or NSOperationQueues.
- Following code is a template that uses Grand Central Dispatch.
dispatch_async(dispatch_get_global_queue(DISPATCH_QUEUE_PRIORITY_DEFAULT, 0), ^{

          // switch to a background thread and perform your expensive operation
          dispatch_async(dispatch_get_main_queue(), ^{

          // switch back to the main thread to update your UI

          });

});
3. Reuse Identifier In The Right Place.
- A common mistake in development is not setting the correct reused Identifier for UITableViewCells, UICollectionViewCells and UITableViewHeaderFooterViews.
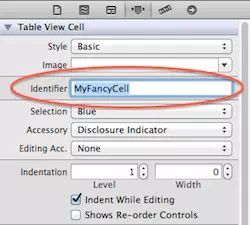
- For performance optimization, when table view uses tableView:cellForRowAtIndexPath: assigning cells to rows, its data should be reused from the UITableViewCell. A table view should maintain a queue of reusable UITableViewCell objects.
- Without reusing identifiers, you have to set up a new cell for every row of table view that is displayed, this has a significant impact on performance, especially the app’s rolling experience.
- Since iOS6, in addition to cells and supplementary views in the UICollectionView, you should also use reused identifiers in header and footer views.
- To use reuse identifiers, add this method to the data source object when you add a new cell to a table view
static NSString *CellIdentifier = @"Cell";
UITableViewCell *cell = [tableView dequeueReusableCellWithIdentifier:CellIdentifier forIndexPath:indexPath];
- This method excludes those existing cells from the queue or creates new cells if necessary using previously registered nib or class. If there don’t have any reusable cells, and you don’t register a class or nib, this method returns nil.
4. Avoid Overly Large XIB.
- Storyboards are rapidly replacing XIB with iOS5. However, XIB is still useful in some scenarios. For example, if your app needs to adapt to pre-iOS5 devices, or if you have a custom reusable view, you will inevitably use them.
- If you have to use XIB, make it as simple as possible. Try configuring a separate XIB for each Controller. Whenever possible, scatter each view in the View hierarchy of a View Controller into a separate XIB.
- It’s important to note that when you load a XIB’s everything is in memory, including any images. If you have a view that you won’t use immediately, you’re wasting valuable memory resources, But the storyboard will instantiate a view controller only when needed.
5. Manage Memory With ARC.
- The ARC(Automatic Reference Counting) was released with iOS5, it’s goal is to avoid memory leaks caused by forgetting to release. It automatically manages the retain and release process for you, so you don’t have to do it manually.
- Here’s the code snippet you’ll often use to create a View
// ...
[self.view addSubview:view];
[view release];
- If you forget to release the view at the end of the code snippet, ARC will automatically do this for you at the bottom.
- In addition to helping you avoid memory leaks, ARC can also help you improve performance by freeing memory from objects you no longer need. So you had better use ARC in all your projects.
- ARC certainly can’t rule out all memory leaks for you. Memory leaks can occur due to blocking, retaining cycles, poorly managed CoreFoundation objects (and C structures), or code corruption.
6. Resize Images In Image View.
- If you want to display an image from the bundle in a UIImageView, you should make sure that the image is the same size as the UIImageView. Zooming in or out images at run time can be a resource drain, especially if the UIImageView is nested in the UIScrollView.
- If the image is loaded from a remote service, that you can’t control the image size, you had better adjust the image size in a background thread after the image has been downloaded, and then use it in UIImageView.
7. Open Gzip Compression.
- A lot of apps rely on remote resources and third-party APIs, and you may develop an app that needs to download XML, JSON, HTML, or other formats from the far end.
- So reduce the size of the document transfer between your app and server is required at some time.
- One way to reduce documentation size is to open gzip on the server and in your app. This has a more significant effect on data with higher compression rates, such as text.
- The good news is that iOS already supports gzip compression by default in NSURLConnection, as does AFNetworking, which is based on it.
- Cloud service providers like Google App Engine already support compressed output also. You can also read articles to learn how to open gzip on Apache or IIS(server).
8. Select Correct Collection.
- Learning to choose the most appropriate class or object for a business scenario is the basis for writing highly efficient code. This is especially correct when dealing with collections.
- Apple has a Collection Programming Topics document that details the differences between available classes and which scenarios you should use them in. This is a must-read document for anyone using collections.
- Arrays: an ordered set of values. Lookup element with index is fast, lookup element with value is slow, insert/delete is slow.
- Dictionary: stores key-value pairs. It’s faster to find value with the key.
- Sets: an unordered set of values. It’s fast to find with values, fast to insert/delete.
9. Use Cache.
- The cache can improve performance largely. But it just caches what you need such as something that’s unlikely to change but needs to be read often. Commonly you can cache the below things such as the response of the remote server, the image, and even the computation results, such as the row height of the UITableView.
- By default, NSURLConnection caches the resource in memory or in storage according to the HTTP Headers it loads. You can even create an NSURLRequest manually and make it load only cached values. Below is the code example.
NSMutableURLRequest *request = [NSMutableURLRequest requestWithURL:url];
// this will make sure the request always returns the cached image
request.cachePolicy = NSURLRequestReturnCacheDataElseLoad;
request.HTTPShouldHandleCookies = NO;
request.HTTPShouldUsePipelining = YES;
[request addValue:@"image/*" forHTTPHeaderField:@"Accept"];
return request;
- Note that you can get a URL request from NSURLConnection, as well as from AFNetworking. This way you don’t have to change all of your networking code to take advantage of this tip.
- If you need to cache something other than an HTTP Request, you can use NSCache.
- NSCache is similar to an NSDictionary except that it automatically deletes its contents when the system recycles memory.
10. Process Memory Warnings.
- Once the system memory is too low, iOS notifies all running apps. If your app receives a memory alert, it needs to release as much memory as possible. The best way to do this is to remove strong references to the cache, image object, and other objects that can be recreated.
- UIKit provides several ways to collect low memory warnings.
- Use the applicationDidReceiveMemoryWarning method in the app delegate.
- Overrides didReceiveMemoryWarning method in your custom UIViewController subclass.
- Register and receive UIApplicationDidReceiveMemoryWarningNotification notification.
- Once you receive such notifications, you need to free up any unnecessary memory usage.
- For example, the default behavior of UIViewController is to remove some invisible views, and some of its subclasses can supplement this method by removing some additional data structures.
- An app with a picture cache can remove images that are not displayed on the screen.
11. Reuse And Lazy Load Views.
- More views mean more rendering, which means more CPU and memory consumption, especially for an app that has a lot of views nested inside a UIScrollView.
- The trick here is to mimic the operations of the UITableView and the UICollectionView. Instead of creating all subviews at once, create them when needed, and when they’re done, put them in a reusable queue. This way, you only need to create your views when the scrolling happens, avoiding uneconomical memory allocation.
- The efficiency of creating views also applies to other aspects of your app. Imagine the scenario when a user clicks a button to render a view, there are two ways to do this.
- Create and hide the view when the screen loads, display it when needed. Create and display when needed.
- Every solution has its advantages and disadvantages.
- In the first method, because you need to create a view from the beginning and keep it until it’s no longer in use, it’s going to consume more memory. But it also makes your app more smooth because when the user clicks on the button it just changes the visibility of the view.
- The second option is the opposite – it consumes less memory, but will not be as smooth as method one when you click the button.
12. Balance Render Method.
- There are many ways to make beautiful buttons in iOS, You can use whole images, resizable images, or you can use CALayer, CoreGraphics, or even OpenGL to draw them. Of course, each of the different solutions has different levels of complexity and performance.
- In a nutshell, it’s faster to use pre-rendered images, because it eliminates the need for iOS to create an image and then draw something up and display it on the screen. The problem is that you need to put all the images that you need into the app bundle, which increases the volume. This makes it even better to use images of variable sizes, so you can save some unnecessary space and no need to make different images for different elements (such as buttons).
- However, using images also means you lose the flexibility to use code to adjust your images. You need to redo them over and over again, and it’s a waste of time.
- And if you want to do an animation, even though each image is just a little bit of a change in detail, you’re going to need a lot of images to make the bundle bigger and bigger.
13. Reuse High-Overhead Objects.
- Initialization of some objects is slow, such as NSDateFormatter and NSCalendar. However, you inevitably need to use them, like parsing data from JSON or XML.
- You need to reuse them when you want to avoid bottlenecks on this object. You can add them to your class as instance variables or class static variables to reuse them.
- Note that if you choose the second method, the object will remain in memory while your app is running, much like the singleton.
- The following code illustrates using a property to delay loading a date formatter. It creates a new instance when the first call and the subsequent call will return an instance that has been created.
@property (nonatomic, strong) NSDateFormatter *formatter; - (NSDateFormatter *)formatter { if (! _formatter) { _formatter = [[NSDateFormatter alloc] init]; _formatter.dateFormat = @"EEE MMM dd HH:mm:ss Z yyyy"; } return _formatter; } - Also, note that setting up an NSDateFormatter is almost as slow as creating a new one! So if your app needs to do a lot of date-time objects formatting, you’ll get a big performance boost from this method.
14. Select The Correct Data Storage Option.
- Which method below is better to store large chunks of data?
- Use NSUerDefaults.
- Use XML, JSON or plist.
- Use NSCoding for archiving.
- Use a local SQL database like SQLite.
- Use Core Data.
- For big data, it’s better to use SQLite or Core Data.
- Using these techniques you can use specific query statements to load only the objects you need.
- At the performance level, SQLite and Core Data are very similar.
- They differ in how they are used, Core Data represents the graph model of an object, but SQLite is a DBMS, Apple generally recommends using Core Data. But you can also use SQLite if your scenario meets.
15. Avoid Repeated Data Processing.
- Many applications need to load data from the server that is often in JSON or XML format.
- It is important to use the same data structure on both the server-side and the client-side.
- Manipulating data in memory to fit your data structure is expensive.
- For example, if you need data to display in a table view, it’s best to take the data from the array structure directly from the server to avoid additional intermediate data structure changes.
