Buttons are the most commonly used and simplest controls in iOS applications and are often used to respond to user actions. Generally, we use UIButton class to implement the button in iOS. This section will focus on adding buttons, beautifying buttons, and how to implement button responses.
1. Add iOS Button In Source Code.
- To add a button to the main view in source code, you first need to instantiate a button object using the UIButton class, then set the location and size, and finally add the button object to the main view using the addSubview() method.
- The following code adds a button object with an orange background color to the main view.
import UIKit class ViewController: UIViewController { override func viewDidLoad() { super.viewDidLoad() // Create UIButton object. let button=UIButton(frame: CGRect(x: 143, y: 241, width: 88, height: 30)) button.backgroundColor=UIColor.orange // Add UIButton object. self.view.addSubview(button) } ...... } - When you run the program, you can see the below picture.

2. Beautify The Button.
- Beautify a button is simply setting the properties of the button. There are two ways to set the button properties.
- One way is to use the property inspector in the interface builder.
- The other way is to set it by source code. The following sections will focus on how to use source code to set buttons properties.
2.1 Set Button Appearance.
- You can set up the button’s title, image, etc to change the button’s appearance.
- Below lists some of the commonly used methods for setting button appearance.
- setBackgroundImage: Sets the background image of the button.
- setImage: Set button image.
- setTitle: Set button title.
- setTitleColor: Set button title color.
- setTitleShadowColor: Set button title shadow color.
- The below code will add a button to the main view. The title of this button is ‘Click Me’ and the color of the title is black.
import UIKit
class ViewController: UIViewController {
        override func viewDidLoad() {
        super.viewDidLoad()

        // Create button.
        let button=UIButton(frame: CGRect(x: 135, y: 241, width: 97, height: 30))

        // Set button title.
        button.setTitle("Click Me", for: UIControlState.normal)

        // Set button title color.
        button.setTitleColor (UIColor.black, for: UIControlState.normal)

        // Add button to the main view.
        self.view.addSubview(button)
        }
        ......
}
2.2 Set Button State.
- When setting the title and color of the button, the state of the button also needs to be set.
- Button state indicating what the title and title color of the button will look like in a certain state. For example,
UIControlState.normalrepresents the normal state of a button. - A view object like a button that can accept user input is also called a control. These controls all have their own state. Below is the control state list.
- normal: normal state.
- highlighted: highlight state.
- disabled: disable state and do not accept any events.
- selected: selected state.
- application: application flags.
2.3 Set Button Type.
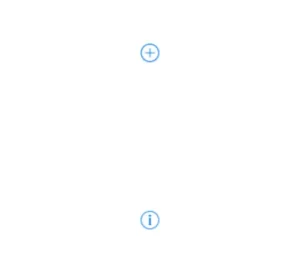
- There are various types of buttons. For example, in the address book, the button to add new contact is a plus (+), while the button to see the details of the call is an exclamation point, etc.
- All these button types can be implemented using
UIButtonTypewhen instantiating the button object. - Below is the
UIButtonTypelist. - system: System default style button.
- custom: Custom style button.
- detailDisclosure: Blue exclamation point button, mainly used for detail description.
- infoLight: Bright color exclamation point.
- infoDark: Dark exclamation point.
- contactAdd: The cross plus button, which is usually used as the add contact entry.
- The following code adds two different styles of buttons to the main view.
import UIKit class ViewController: UIViewController { override func viewDidLoad() { super.viewDidLoad() // Add first button with contactAdd type. let button1=UIButton(type: UIButtonType.contactAdd) button1.center=CGPoint(x: 190, y: 250) self.view.addSubview(button1) // Add second button with detailDisclosure type. let button2=UIButton(type: UIButtonType.detailDisclosure) button2.center=CGPoint(x: 190, y: 450) self.view.addSubview(button2) } ...... } - When you run the program, you can see the below effect.
3. Add Button Response.
- There are two methods to add a button response code, one is through interface builder, the other is through source code.
3.1 Use interface builder to add button response code.
- Add a button using the interface builder can use drag and drop to implement the button response code, which is also the simplest way to implement button response.
- The following steps will implement a button that will change the main view background color when users tap it.
- Open the Main.storyboard file, drag the button control from the view library to the main view, and set the title to “Tap me, Change View Color“.
- Click the Show the Assistant editor button to show and adjust the Xcode interface builder.
- Hold down the Ctrl key and drag the button object in the interface, and a blue line appears, dragging the blue line to the white space of the ViewController.swift file.
- When you release the mouse, a dialog box that declares the associated socket variable will pop up.
- Set the Connection option to Action to indicate that an Action is associated. Set the Name to tapButton, indicate that the associated action is named tapButton, but you can specify any name here.
- Click the Connect button and you’ll see the code in the ViewController.swift file. Now a method called tapButton() will be triggered when the user taps the button.
- Note: the above method binds the action declaration and UI object association at the same time, and there is also another way to declare the action before it is associated.
- To declare an action method you can use the keyword IBAction. This keyword tells the Main.storyboard that this method is an operation method and can be triggered by a control.
- After declaring an action, a small hollow circle appears in front of the code, indicating that the action has not been associated.
- After the action is declared, the association can be made. First, use the tool in the adjustment window to adjust the interface builder. Then, hold down the Ctrl key and drag the button object in the interface, and a blue line appears, associating the blue line with the action in the file ViewController.swift.
- Finally, when the mouse is released, the button object is associated with the action method. At this point, the hollow circle in front of the action becomes a solid circle, which indicates that the action has been associated.
- Open the ViewController.swift file and write the code that will implement the button response.
import UIKit
class ViewController: UIViewController {

    var isYellow:Bool=false

    @IBAction func tapButton(_ sender: AnyObject){

        if(isYellow){
           self.view.backgroundColor=UIColor.white
           isYellow=false
        }else{
           self.view.backgroundColor=UIColor.yellow
           isYellow=true
        }

    }
}
3.2 Use code to add button response.
To add a response method to the button that is created in the source code, you need to use the addTarget (action:for:) method. The syntax is as follows.
3.2.1 func addTarget(_ target: AnyObject?, action: Selector, for controlEvents: UIControlEvents)
- target: Represents the target object. It is the sender of the action message.
- action: Represents a selector used to identify the action method. It must not be empty.
- controlEvents: Represents control events that trigger the action method.
3.2.2 There are 19 control events in iOS.
- touchDown: Single touch press event: when a user touches the screen, or when a new finger drops.
- touchDownRepeat: Multi-touch press event, the touch count is greater than 1: when the user presses the second, third, or fourth finger.
- touchDragInside: When a touch is dragged inside the control window.
- touchDragOutside: When a touch is dragged outside the control window.
- touchDragEnter: When a touch is dragged from the control window outside to inside.
- touchDragExit: When a touch is dragged from the inside of the control window to the outside.
- touchUpInside: All touch lift events within the control.
- touchUpOutside: All touch lift events outside the control.
- touchCancel: All touch cancellation events, such as when a touch is canceled due to place too many fingers on the screen or is interrupted by a lock or a phone call.
- valueChanged: Send notifications when the value of the control changes. Used for controls like sliders, segmented controls, etc. Developers can configure when the slider control sends notifications.
- editingDidBegin: Send notifications when editing begins in a text control.
- editingChanged: Send notifications when text in a text control is changed.
- editingDidEnd: Send notifications when editing in a text control is finished.
- editingDidEndOnExit: A notification is sent when editing in a text control ends by pressing the enter key (or equivalent action).
- allTouchEvents: Notifies all touch events.
- allEditingEvents: Notifies all events about text editing.
- applicationReserved: Application reserved events.
- systemReserved: All the system reserved events.
- AllEvents: Contains all events.
- The below code will change the main view background color when tapping the button.
import UIKit
class ViewController: UIViewController {
        var isCyan:Bool=false

        override func viewDidLoad() {
            super.viewDidLoad()

            let button=UIButton(frame: CGRect(x: 90, y: 545, width: 225, height: 30))

            button.setTitle("Tap me,Change View Color", for: UIControlState())

            button.setTitleColor (UIColor.black, for: UIControlState())

            self.view.addSubview(button)

            button.addTarget(self, action:#selector(UIViewController.tapbutton), for:UIControlEvents.touchUpInside)
        }

        @objc func tapbutton(){
            if(isCyan){
                self.view.backgroundColor=UIColor.white
                isCyan=false
            }else{
                self.view.backgroundColor=UIColor.cyan
                isCyan=true
            }
        }
}
