How did you set up UI layout in older iOS application development? Write a lot of coordinate calculation code? To ensure a perfect UI effect on both the 3.5-inch and 4.0-inch screens, you sometimes have to write different coordinate calculations for each screen? But now with the iOS auto-layout function, things change for the better.
1. What is Autolayout?
- Autolayout is an “auto layout” technique for laying out UI interfaces. Autolayout was introduced in iOS 6, but it wasn’t widely used at that time because Xcode 4 wasn’t working well with it.
- Since iOS 7 (Xcode 5), the development efficiency of Autolayout has been greatly improved. Apple also officially recommends that developers use Autolayout as much as possible to layout the UI. Autolayout can easily solve the problem of screen adaptation.
- There are two core concepts of Autolayout, reference, and constraint. You had better understand them correctly, this can help you to use auto-layout easily.
2. How To Implement Autolayout In Code?
- Create concrete constraint objects using the NSLayoutConstraint class.
- Add the constraint object to the corresponding view.
- (void)addConstraint:(NSLayoutConstraint *)constraint;
- (void)addConstraints:(NSArray *)constraints;
- Before using the above code, you should first disable the auto-resizing by setting the following property of view to NO.
view.translatesAutoresizingMaskIntoConstraints = NO
- Before adding a constraint, make sure that the associated controls are already on their parental controls.
- You don’t have to set a frame for the view anymore.
3. NSLayoutConstraint Introduction.
- An NSLayoutConstraint object represents a constraint. A common way to create a constraint object use the below code.
+(id)constraintWithItem:(id)view1 attribute:(NSLayoutAttribute)attr1 relatedBy:(NSLayoutRelation)relation toItem:(id)view2 attribute:(NSLayoutAttribute)attr2 multiplier:(CGFloat)multiplier constant:(CGFloat)c;
- Below is the introduction of the arguments.
- view1: the control to be constrained.
- attr1: the type of constraint (do what constraints).
- relation: relation with reference controls.
- view2: the reference control.
- attr2: the type of constraint (do what constraints).
- multiplier: the multiplier number.
- c: constant.
3.1 AutoLayout Core Formula.
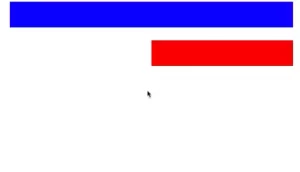
- For example, if you want to implement the following effect, you can use the code below.
obj1.property1 =(obj2.property2 * multiplier)+ constant value
- Below is the above code effect image.
- Below is the example full source code.
- (void)viewDidLoad{
        [super viewDidLoad];

        // 1.Add a red view object.
        UIView *redView = [[UIView alloc] init];
        redView.backgroundColor = [UIColor redColor];
        redView.translatesAutoresizingMaskIntoConstraints = NO;
        [self.view addSubview:redView];

        // Add a blue view object.
        UIView *blueView = [[UIView alloc] init];
        blueView.backgroundColor = [UIColor blueColor];
        blueView.translatesAutoresizingMaskIntoConstraints = NO;
        [self.view addSubview:blueView];

        // Add contratints to blueview.
        addConstraintsToBlueView:blueView;

        // Add contratints to redview.
        addConstraintsToRedView: view1:blueView view2:redView;

}


-(void)addConstraintsToBlueView:(UIView *) view{
        // Add constraints in blueview

        // Height
        NSLayoutConstraint *blueHeight =
        [NSLayoutConstraint constraintWithItem:view attribute:
        NSLayoutAttributeHeight relatedBy:NSLayoutRelationEqual toItem:
        nil attribute:NSLayoutAttributeNotAnAttribute multiplier:1.0
        constant:40];
        [view addConstraint:blueHeight];

        //Left margin.
        CGFloat margin = 20;
        NSLayoutConstraint *blueLeft =
        [NSLayoutConstraint constraintWithItem:view attribute:
        NSLayoutAttributeLeft relatedBy:NSLayoutRelationEqual toItem:
        self.view attribute:NSLayoutAttributeLeft multiplier:1.0 constant:
        margin];
        [self.view addConstraint:blueLeft];

        // Top margin
        NSLayoutConstraint *blueTop =
        [NSLayoutConstraint constraintWithItem:view attribute:
        NSLayoutAttributeTop relatedBy:NSLayoutRelationEqual toItem:
        self.view attribute:NSLayoutAttributeTop multiplier:1.0 constant:
        margin];
        [self.view addConstraint:blueTop];

        // Right margin
        NSLayoutConstraint *blueRight =
        [NSLayoutConstraint constraintWithItem:view attribute:
        NSLayoutAttributeRight relatedBy:NSLayoutRelationEqual toItem:
        self.view attribute:NSLayoutAttributeRight multiplier:1.0 constant:
        -margin];
        [self.view addConstraint:blueRight];

}

-(void)addConstraintsToRedView:blueView:(UIView *) view1 redView:(UIView *) view2{

        // Add constraints in redview.

        // Set the red view right side aligns the blue view right side.
        NSLayoutConstraint *redRight =
        [NSLayoutConstraint constraintWithItem:view2 attribute:
        NSLayoutAttributeRight relatedBy:NSLayoutRelationEqual toItem:
        view1 attribute:NSLayoutAttributeRight multiplier:1.0
        constant:0.0];
        [self.view addConstraint:redRight];

        // Set the red view height equals to blue view height.
        NSLayoutConstraint *redHeight =
        [NSLayoutConstraint constraintWithItem:view2 attribute:
        NSLayoutAttributeHeight relatedBy:NSLayoutRelationEqual toItem:
        view1 attribute:NSLayoutAttributeHeight multiplier:1.0 constant:
        0.0];
        [self.view addConstraint:redHeight];

        // Set the red view top euqals to blue view bottom plus margins.
        NSLayoutConstraint *redTop =
        [NSLayoutConstraint constraintWithItem:view2 attribute:
        NSLayoutAttributeTop relatedBy:NSLayoutRelationEqual toItem:
        view1 attribute:NSLayoutAttributeBottom multiplier:1.0 constant:
        margin];
        [self.view addConstraint:redTop];

        // Set the red view width equals to half or the blue view width.
        NSLayoutConstraint *redWidth =
        [NSLayoutConstraint constraintWithItem:view2 attribute:
        NSLayoutAttributeWidth relatedBy:NSLayoutRelationEqual toItem:
        view1 attribute:NSLayoutAttributeWidth multiplier:0.5 constant:
        0.0];
        [self.view addConstraint:redWidth];

}
4. Rule Of Adding Constraints.
- After creating the constraint, you need to add it to the view which you want to control.
- Note that when adding constraints, the target view needs to follow the following rules.
- For the constraint relationship between two same-level views, add the constraints to their parent view.
- For constraints between two different hierarchical views, add constraints to their nearest common parent view.
- For the constraint relationship between two views with hierarchical relationships, add constraints to the parent view at the higher level.
5. VFL Language.
- VFL is the abbreviation of Visual Format Language. It’s an abstract language that apple introduced to simplify the coding of Autolayout.
5.1 VFL Example.
- In the below code example, the cancelButton width is 80, the acceptButton width is 60, and the space between them is 10.
H:[cancelButton(80)]-10-[acceptButton(60)]
- In the below code example, the width of wideView is greater than or equal to 70 points, and the constraint condition has a priority of 800 (the maximum priority is 1000, and the higher the priority, the constraint will be used first).
H:[wideView(>=70@800)]
- The below example shows that in the vertical direction, you start with a redBox, followed closely by a yellowBox that equals the redBox height.
V:[redBox]-[yellowBox(==redBox)]
6. VFL Usage.
- Use VFL to create constraint arrays as below.
+ (NSArray *)constraintsWithVisualFormat:(NSString *)format options:(NSLayoutFormatOptions)opts metrics:(NSDictionary *)metrics views:(NSDictionary *)views;
- Below is the explanation of the above parameters.
- format: VFL statement.
- opts: constraint type.
- metrics: the specific number used in the VFL statement.
- views: controls used in VFL statements.
6.1 VFL Usage Example.
- Create a shortcut macro definition for a dictionary that contains controls used in the VFL statement.
NSDictionaryOfVariableBindings(…)

NSDictionary *views = NSDictionaryOfVariableBindings(blueView, redView);

NSArray *conts2 = [NSLayoutConstraint constraintsWithVisualFormat:

@"V:[blueView(==blueHeight)]-margin-|" options:0 metrics:

@{@"blueHeight" : @40, @"margin" : @20} views:views];
6.2 Blueview and RedView Example Implemented By VFL.
- Below is the example full source code.
- (void)viewDidLoad{

        [super viewDidLoad];

        // Add red view.
        UIView *redView = [[UIView alloc] init];
        redView.backgroundColor = [UIColor redColor];
        redView.translatesAutoresizingMaskIntoConstraints = NO;
        [self.view addSubview:redView];

        // Add blue view.
        UIView *blueView = [[UIView alloc] init];
        blueView.backgroundColor = [UIColor blueColor];
        blueView.translatesAutoresizingMaskIntoConstraints = NO;
        [self.view addSubview:blueView];

        // Generate constraints by VFL.
        NSArray *conts =
        [NSLayoutConstraint constraintsWithVisualFormat:
         @"H:|-20-[blueView]-20-|" options:0 metrics:nil views:
         @{@"blueView" : blueView}];

        [self.view addConstraints:conts];

        NSArray *conts2 =
        [NSLayoutConstraint constraintsWithVisualFormat:
         @"V:|-20-[blueView(40)]-20-[redView(==blueView)]"
        options:NSLayoutFormatAlignAllRight metrics:nil
        views:@{@"blueView" : blueView, @"redView" : redView}];

        [self.view addConstraints:conts2];

        NSLayoutConstraint *redWidth =
        [NSLayoutConstraint constraintWithItem:redView attribute:
        NSLayoutAttributeWidth relatedBy:NSLayoutRelationEqual toItem:
        blueView attribute:NSLayoutAttributeWidth multiplier:0.5 constant:
        0.0];
        [self.view addConstraint:redWidth];
}}
