This article takes an iOS 11 application as an example to show developers how to create projects using Xcode 10. It also shows some functions of the iOS simulator and interface builder.
1. Create iOS Project.
- All the files for an iOS application are saved under an Xcode project.
- The project can help users to manage code files and resource files.
- Below are the steps to create a project using Xcode.
- Open Xcode and the Welcome to Xcode dialog box pops up.
- Select the Create a new Xcode project option, and then the Choose a template for your new project: dialog pops up.
- Select the Single View App template in the iOS —> Application, click the Next button, and the Choose options for your new project: dialog box will pop up. Input Product Name, Organization Identifier. Choose Swift in Language drop-down list.
- UI Tests are a new feature added since Xcode 7.0, it is a Testing component that automatically Tests UI interactions. It can implement automation tests such as click button, click view or enter text automatically by code. In actual development, as the project grows larger, it is difficult to cover all test cases manually. Especially when new features are added, old features are also needed to be retested again. This results in a lot of time for regression testing. There is a lot of repetitive work, some of which can be done automatically, and UI Tests can help solve this problem.
- When you complete the input content process, click the Next button to open the save location dialog box for the project. Click the Create button, and a project named Hello World is created.
2. Run iOS Project.
- Once the project is created, you can run the program in the project. Click the Run button ( Triangle button at top left ) to execute it.
- You can see two screens, the first screen is the launch screen, the second screen is the iOS example app screen because we do not write any code, so the app screen is empty.
- If you do not want to show the launch screen when the program is started, you can open the
info.plistfile, in this file, find the Launch screen interface file base name and delete the content.
3. Interface Builder.
- The interface builder is used to design the iOS app’s user interface.
- You can click on the Main.storyboard file to open the file to edit.
- When you open it, you can see that there are 4 parts.
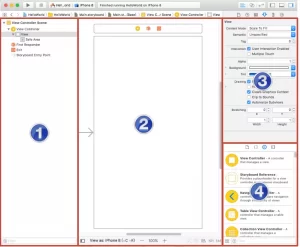
- Part number 1 is the dock.
- Part number 2 is the canvas: where the user interface is designed, the area pointed by the arrow in the canvas is the design area. Generally, it is called scene or main view.
- Part number 3 is the inspector panel: used to edit the properties of the currently selected view object.
- Part number 4 is the view objects library panel.
- Above the canvas’s design interface is a small dock, a minimal version of a file manager. The dock shows the first level of control in the scene, each scene has at least one ViewController, one FirstReponder, and one Exit.
4. Add View Object.
- Now we can add view objects by the interface builder.
- Open the view objects library panel, and input text to search TextField view object. Just drag and drop it into the center of the Main.storyboard screen center.
- Double click the TextField view object, and input Hello World in it. Now the iOS example main screen has the Hello World text.
5. Customize iOS App Icon
- The default iOS app icon in the simulator is a white grid icon. But you can use your favorite icon to replace it as below.
- Right-click the info.plist file, click Add Files to “HelloWorld” menu item in the popup menu.
- Select the logo image file and click Add button to add the logo png file to the project. Note: the size of the iOS 11 icon must be 120*120 pixels.
- Click and open the info.plist file again, and add the Icon files item to it.
