This example will tell you how to use JavaScript to export an Html table data to an Excel file and download it.
1. Export Data From Html Table To Excel JavaScript Source Code.
- Below is an Html web page source code, it contains a snippet of JavaScript code at the end of the page.
- You can save the below source code to a local Html file.
- When you browse the below Html page in a web browser, it will display a Html table and a link at top of the table. When you click the link, it will export the Html table data to a local Excel file.
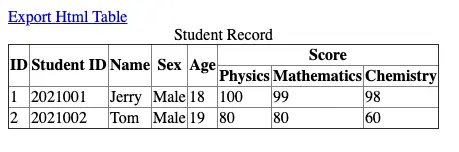
- Below is the web page picture.
- Below is the source code.
<!DOCTYPE html>
<html>
<head>
<meta http-equiv="Content-Type" content="text/html; charset=utf-8" />
<title>How To Export Data From Html Table To Excel Use JavaScript</title>

<style>
    /* This style is only used when browse this page in a web browser, excel will not separate the table border, so this style is not needed */
    table {
        border-collapse: collapse;
    }
</style>

</head>
<body>

<div>

<a href='' id='dd'>Export Html Table To Excel</a>

<!-- Set border="1" to show table borders -->
<table border="1">
    <!-- The caption element can generate the table title, and its cell column span is the number of columns in the table -->
    <caption>Student Record</caption>
    <tr>
        <!-- You can use rowspan and colspan to merge cells -->
        <th rowspan="2">ID</th>
        <th rowspan="2">Student ID</th>
        <th rowspan="2">Name</th>
        <th rowspan="2">Sex</th>
        <th rowspan="2">Age</th>
        <th colspan="3">Score</th>
    </tr>
    <tr>
        <th>Physics</th>
        <th>Mathematics</th>
        <th>Chemistry</th>
    </tr>
    <tr>
        <td>1</td>
        <td>2021001</td>
        <td>Jerry</td>
        <td>Male</td>
        <td>18</td>
        <td>100</td>
        <td>99</td>
        <td>98</td>
    </tr>
    <tr>
        <td>2</td>
        <td>2021002</td>
        <td>Tom</td>
        <td>Male</td>
        <td>19</td>
        <td>80</td>
        <td>80</td>
        <td>60</td>
    </tr>
     <tr style='display:none'>
        <td>3</td>
        <td>2021002</td>
        <td>Mickey</td>
        <td>Female</td>
        <td>18</td>
        <td>96</td>
        <td>99</td>
        <td>100</td>
    </tr>
</table>

<script>
    // Use the outerHTML attribute to get the HTML code of the entire table element (including the <Table> tag), and then wrap it into a complete HTML document. Set charset to urf-8 to prevent garbled code
    var html = "<html><head><meta charset='utf-8' /></head><body>" + document.getElementsByTagName("table")[0].outerHTML + "</body></html>";

    // Instantiate a Blob object. The first parameter of its constructor is an array containing file contents, and the second parameter is an object containing file type attributes
    var blob = new Blob([html], { type: "application/vnd.ms-excel" });
    var a = document.getElementById("dd");

    // Use URL.createObjectURL() method to generate the Blob URL for the a tag.
    a.href = URL.createObjectURL(blob);

    // Set the download file name.
    a.download = "student-record.xls";
</script>

</body>
</html>
