Git operation is often used in daily work. But for beginners, Git is very strange and confusing to operate. This article is mainly aimed at beginners to Git, understanding the basic principles of Git, and mastering some common Git commands.
1. Git Workflow.
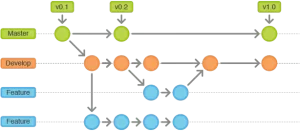
- The below picture shows the git system process diagram, first, let’s look at the following four terms.
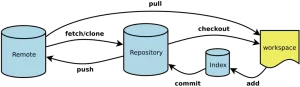
- Workspace: This is where programmers make development changes. The source code here is what you currently see and is up to date. Any object is born and modified in the workspace.
- Index / Stage: The index file in the
.gitdirectory is the temporary area that records the relevant information (file name, size, timestamp…) of thegit addcommand added files, it does not save the file entity, instead it points to each file entity through id. You can use the commandgit statusto view the status of the temporary area ( also called stage area ). - Temporary zones mark what is managed by git in your current workspace. When you complete a requirement or function and need to commit it to a remote repository, the first step is to commit it to the staging area through
git addand make it being managed by git. Any changes are versioned from entering the index area. - Local Repository: Holds the various versions of the submitted object, which is older than the contents of the workspace and staging area. After you execute the command
git commit, the directory tree of the index is synchronized to the local repository to facilitate synchronization between the local repository and the remote repository through the commandgit pushfor the next step. Only when a change is committed to a local repository can it leave a trace in the repository. - Remote Repository: The content of a remote repository can be modified by a collaborating local repository located in multiple locations, so it may or may not be synchronized with the local repository, and its content is the oldest. If you want to share local changes with collaborators, you should push your code changes to a remote repository for sharing.
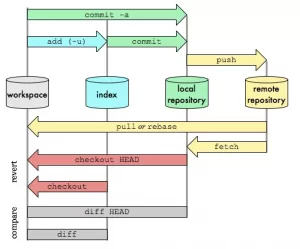
- The following diagram is a more direct illustration of the relationship between the four regions. Some commands may not be clear, but they will be explained in detail in the next section.
2. General Git Commands.
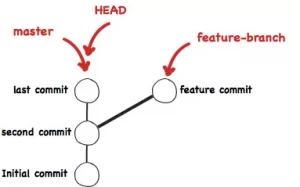
2.1 head.
- head, which always points to the most recent commit point for the currently processed branch. If your branch changes, or if a new commit point is created, the head changes.
2.2 add.
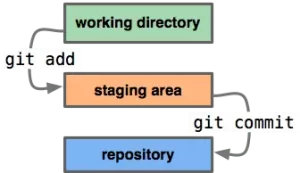
- The add command is very simple. It mainly implements submitting the contents of workspace modifications to the temporary storage area, which is managed by git.
git add .: Add all files of the current directory to the temporary area.git add <dir>: Add the specified directory to the temporary area, including subdirectories.git add <file1>: Add the specified file to the temporary area.
2.3 commit.
- Commit-related commands are also simple, mainly to submit the contents of the temporary storage area to the local repository, and make the head of the current branch move a submission point backward.
git commit -m <message>: Submit content in the temporary storage area to the local repository. The message is the submission description data.git commit <file1> -m <message>: Submit the specified files in the staging area to the local repository.git commit --amend -m <message>: Use a new commit to replace the last commit.
2.4 branch.
- When it comes to collaboration, of course, there are branches.
- When it comes to branches, there are roughly four operations: show branches, switch branches, create branches, and delete branches.
git branch: List all local branches.git branch -r: List all remote branches.git branch -a: List all local and remote branches.git branch <branch-name>: Create a new branch, but stay in the current branch.git checkout -b <branch-name>: Create a new branch and switch to it.git branch --track <branch><remote-branch>: Create a new branch to establish a trace relationship with the specified remote branch.git checkout <branch-name>: Switch to the specified branch and update the workspace.git branch -d <branch-name>: Delete specified branch.git push origin --delete <branch-name>: Delete specified remote branch.
2.5 merge.
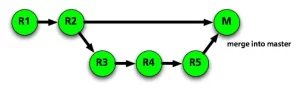
- The merge command merges the different branches. As shown in the figure above, in actual development, we might cut out a branch from the master branch, and then proceed to the development. After going through the commit records of R3, R4, and R5, we need to merge them back into the master branch when the development is completed.
- Below are the best practice steps that merge action needs to follow.
git fetch <remote>: Before the merge, pull the latest remote repository code.git merge <branch>: Merge the specified branch to the current branch.- In general, after the merge, conflict may arise, which needs to be resolved manually. This is mainly because two users have modified the same area of the same file, it needs to be removed manually.
2.6 rebase.
- Rebase is another option for merging. In the beginning, we are on the new branch, if we execute the command
git rebase dev, then the new commit on the new branch is repeated on the master branch, and finally checkout switches back to the new branch. This is the same as merge, where the branches before and after merging have not changed.

- The popular explanation for the command
git rebase devis that the new branch wants to stand on dev’s shoulder and continue. Rebase also needs to resolve conflicts manually.
2.7 The difference between rebase and merge.
- Now we have two branches, test & master, which are submitted as follows.
D---E test / A---B---C---F master - Execute
git merge testin master, and you get the following results. As you can see, the merge operation generates a new node with the previous submissions displayed separately.D--------E / \ A---B---C---F----G test, master - Execute
git rebase testin master and get the following result. The rebase operation does not generate new nodes but merges the two branches into a linear submission.A---B---D---E---C'---F' test, master
- If you want a clean linear history tree without merge commit, you should choose
git rebase. - If you want to keep a complete history and avoid the risk of rewriting commit history, you should choose to use
git merge.
2.8 reset.
- The reset command points the current branch to another location and changes the workspace and stage area accordingly.
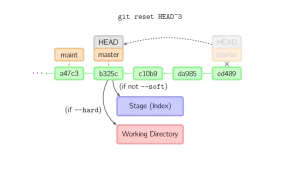
git reset —soft <commit>: Change the submission point only, and the contents of the stage area and working directory remain unchanged.git reset —mixed <commit>: Change the submission point while changing the contents of the stage area.git reset —hard <commit>: The contents of the stage area and workspace will be modified to exactly the same state as the submission point.git reset --hard HEAD: Get the workspace back to its last commit state.
2.9 revert.
git revertuses a new submission to eliminate any changes made by a historical submission.

git commit -am "update readme"
git revert 15df9b6
2.10 Difference between revert and reset.
git revertrolls back the previous commit with a new commit.git resetdeletes the specified commit directly.
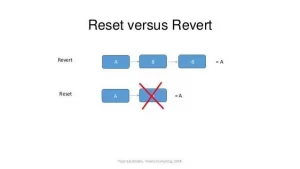
- Looking at the rollback operation, the effect is similar. But there are differences when we continue the old version of merge in the future. Because
git revertis submitted before the converse commit “neutralizes”, this part of the change will not occur again when the old branch is merged in the future, this will reduce conflicts. Butgit resetdeletes some commits on a branch, so when the old branch merges again, these rolled-back commits should also be introduced, causing many conflicts. git resetmoves head backward, whilegit revertmove the head forward, but the content of the new commit is the opposite of the content of the revert so can offset the content need to revert.
2.11 push.
- Upload local repository branch to remote repository branch to achieve synchronization.
git push <remote><branch>: Upload local designated branch to the remote repository.git push <remote> --force: Force push the current branch to a remote repository, even if there are conflicts.git push <remote> --all: Push all branches to the remote repository.
2.12 Other git commands.
git status: Display changed files.git log: Display the version history of the current branch.git diff: Displays the differences between staging area and workspace.git diff HEAD: Displays the difference between workspace and latest commit for the current branch.git cherry-pick <commit>: Select a commit and merge it into the current branch.
